Using HTML to Create Images
Find out how to use HTML to generate rich images with useful things like graphs, QRCodes, dynamic text, and more.

Using HTML to Create Images
What if you could use the rich ecosystems available to web developers to create, design, and generate images? What if you could do this without sacrificing anything, and the image generated is precisely what you developed using HTML, CSS, Javascript, and everything that goes into web design?
At cloudlayer.io, we offer the ability to use any HTML to dynamically generate an image using our REST-based Html to Image API endpoint or one of our no-code solutions, such as our Html to Image Zap with Zapier. You can design it as simple or as complex as you want. We use Chrome Puppeteer to convert HTML to an image, so the rendering fidelity matches precisely.
So why use HTML to create an image in the first place? There are many scenarios where it is significantly easier than simply drawing on a 2d surface. For example, what if you wanted to generate a bar graph or a QR Code?
You could put together a simple HTML page and pull in the many available reporting frameworks or QR generation frameworks in minutes. Then customize how it looks using some CSS, or even import a CSS framework like Tailwind or Bootstrap to simplify the layout.
Let's go through how to create several types of images. We will start simple and get more complex. But first, let's go through the basics of our Html to Image API.
The Html to Image Endpoint
We have several endpoints that you can look at in our documentation, but let's focus on just the HTML to Image endpoint. If you plan to use the Zapier no-code solution, you can gloss over this section as the Zap handles calling the API, encoding it, and getting a response back.
The Html to Image API endpoint is located at:
https://api.cloudlayer.io/v2/html/imageThe most basic request you can send is, passing in just the HTML. (We require the HTML to be converted to a base64 string, so it doesn't interfere with the JSON format).
We are going to use a very basic "Hello world!" example:
<html><body><h1>Hello world!</h1></body></html>When you encode the above HTML to a base64 string, you end up with:
PGh0bWw+PGJvZHk+PGgxPkhlbGxvIHdvcmxkITwvaDE+PC9ib2R5PjwvaHRtbD4=API Key
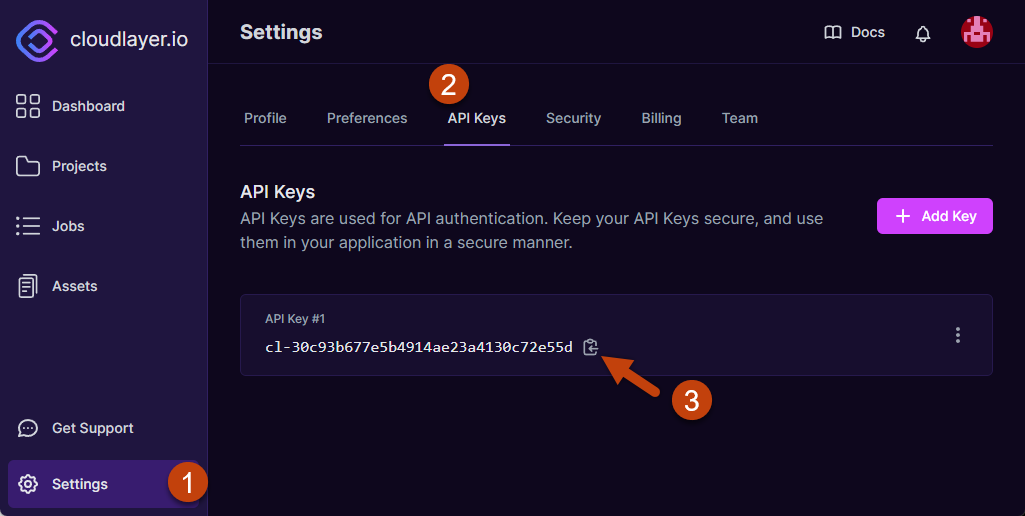
You need to pass in your API Key when you call our API. To do that you will need to signup for a free account. To get your API key, you can follow the following steps:
- First, click on Settings in the lower-left on the sidebar.
- Next, click on "API Keys" in the settings tabs.
- Copy API Key to your clipboard by clicking the clipboard icon.
You will then pass an X-API-Key value as a header to your POST request to the API endpoint. For more information on how to pass in your API Key, look at our documentation on "Using Your API Key."
You will get an immediate JSON response when calling the "html/image" endpoint. By default, all requests are asynchronous. The JSON response you get back has a "Pending" status property. You can either use a webhook callback URL to get an immediate response once processing is done or call the "jobs" endpoint to check the status and get the final "assetUrl." More about this in our docs here.
What happened? Where is my image?
The generated image gets uploaded to the storage in your cloudlayer.io account as an "asset". We then cache and optimize the image asset for delivery on the internet using our CDN for fast and efficient access. All this gets done behind the scenes, so you never have to worry about that.
You can use the URL in "assetUrl" to link to the image asset without incurring any cost or charge to your account. Bandwidth usage to the assets is unlimited, and these assets will remain in your account as long as it's active.
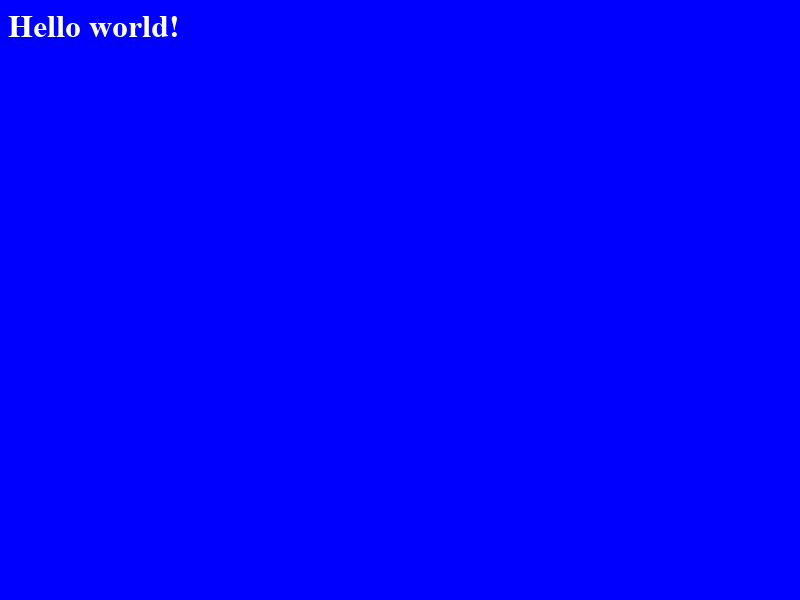
Basic Hello World Image Example
If you followed through the previous section covering the Html to Image endpoint, you would have a request set up to generate a very basic "Hello world!" image test. However, if you skipped that section, the gist is that you created some HTML, base64 encoded it, and then passed it to our API.
The resulting image from this example will look like the following.

As you can see, this is an extremely simple example. But let's have some fun and start playing around with things. First, let's make the background color of the image blue and the text white.
<html>
  <body style="background-color: blue;">
    <h1 style="color: #fff">Hello world!</h1>
  </body>
</html>We will leave off the base64 string for the remainder of these examples but remember that anytime you pass HTML into the API, it must be in base64 format.
Ok, now we have a blue, rather ugly "Hello world!" example. What if we wanted to use CSS instead of inline styles? Well, that's easy. You can change your HTML to do that.
<html>
  <header>
    <style>
      body {
        background-color: blue;
      }
      h1 {
        color: #fff;
      }
    </style>
  </header>
  <body>
    <h1>Hello world!</h1>
  </body>
</html>The resulting image will look identical but now with cleaner HTML.
Using Custom Fonts
Now let's start getting a bit fancier, and let's use a custom font from Google Fonts. Let's use something crazy like "Cedarville Cursive" to illustrate the point.
While we are it, let's also change the background color to a slightly more pleasing blue color.
<html>
  <header>
    <link rel="preconnect" href="https://fonts.googleapis.com" />
    <link rel="preconnect" href="https://fonts.gstatic.com" crossorigin />
    <link
      href="https://fonts.googleapis.com/css2?family=Cedarville+Cursive&display=swap"
      rel="stylesheet"
    />
    <style>
      body {
        background-color: #3a3ad6;
      }
      h1 {
        color: #fff;
        font-family: "Cedarville Cursive";
        font-size: 3rem;
      }
    </style>
  </header>
  <body>
    <h1>Hello world!</h1>
  </body>
</html>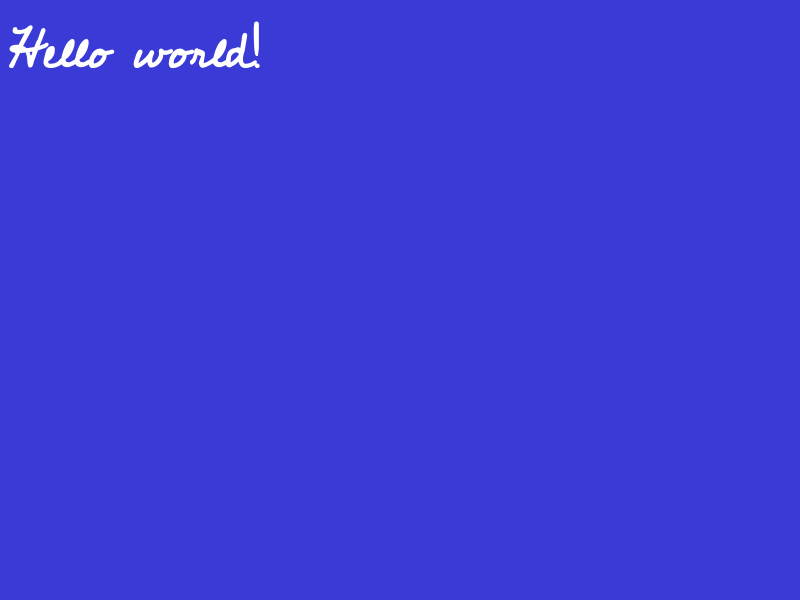
The fonts and any other external content are retrieved during rendering.
Image Dimensions
Currently, the image dimensions are the default 800x600 and not very useful. Let's change it to something similar to a banner format.
Passing in the "viewPort" dimensions, we can take control of the image size.
{
	"html": "...",
	"viewPort": {
		"height": 150,
		"width": 300
	}
}This produces a significantly smaller image with the dimensions you specify.
More Complex Examples
Now that we have shown the basic usage of the Html to Image service that we offer, let's look at some more complex examples.
We can import popular frameworks for generating graphs, reports, barcodes, and more.
Generate a Graph Image
In this example, we will use the popular graphing library Chart.js using the Html to Image endpoint to generate dynamic graph images. Remember, you can use any charting library you prefer, we are just using this one in the example.
The HTML is relatively simple, in this example the majority of the code is Javascript. The HTML consists of a single "canvas" element. We are statically setting the values for the reports, in reality, you would most likely be pulling this data from your API prior to submitting the request for generating the image.
<body style="background-color: #F3F4F6;margin:0;">
    <script
      type="text/javascript"
      src="https://cdn.jsdelivr.net/npm/[email protected]/dist/chart.min.js"
    ></script>
    <canvas id="myChart" style="width:100vw;height:100vh;"></canvas>
    <script>
      const ctx = document.getElementById("myChart").getContext("2d");
      const myChart = new Chart(ctx, {
        type: "bar",
        data: {
          labels: ["Red", "Blue", "Yellow", "Green", "Purple", "Orange"],
          datasets: [
            {
              label: "# of Votes",
              data: [12, 19, 3, 5, 2, 3],
              backgroundColor: [
                "rgba(255, 99, 132, 1)",
                "rgba(54, 162, 235, 1)",
                "rgba(255, 206, 86, 1)",
                "rgba(75, 192, 192, 1)",
                "rgba(153, 102, 255, 1)",
                "rgba(255, 159, 64, 1)",
              ],
              borderWidth: 1,
            },
          ],
        },
        options: {
          animation: {
            duration: 0,
          },
          scales: {
            y: {
              beginAtZero: true,
            },
          },
        },
      });
    </script>
</body>Then there is some boilerplate code that handles loading the HTML, formatting it, and submitting the request to return back the asset URL for the generated image.
import fs from "fs";
import fetch from "node-fetch";


const html = fs.readFileSync("./business-chart.html");
const opts = {
  html: Buffer.from(html).toString("base64")
};

(async () => {
  const assetUrl = await getAssetUrl();
  console.log(assetUrl);
})();

async function getAssetUrl() {
  const data = await call("POST", "html/image", opts);

  return new Promise((resolve, reject) => {
    if (data.status === "pending") {
      let count = 0;
      const pollInterval = setInterval(async () => {
        const rsp = await call("GET", `jobs/${data.id}`);

        if(rsp.status === "success") {
            clearInterval(pollInterval);
            resolve(rsp.assetUrl);
        }

        if (count > 10) {
          clearInterval(pollInterval);
          reject("Timed out")
        }
      }, 500);
    }
  });
}

async function call(method, path, opts) {
  const rsp = await fetch(
    `https://api.cloudlayer.io/v2/${path}`,
    {
      method: method,
      body: JSON.stringify(opts),
      headers: {
        "Content-Type": "application/json",
        "X-API-KEY": "<your-api-key>",
      },
    },
    opts
  );

  return await rsp.json();
}The image can be loaded directly from the URL that is provided, it will look something like the following: "https://assets.cloudlayer.io/....". The assets subdomain is our CDN endpoint, your image will be optimized, and cached on edge servers near your users for extremely fast delivery.
The resulting image generated using the Html to Image endpoint will look like the following.
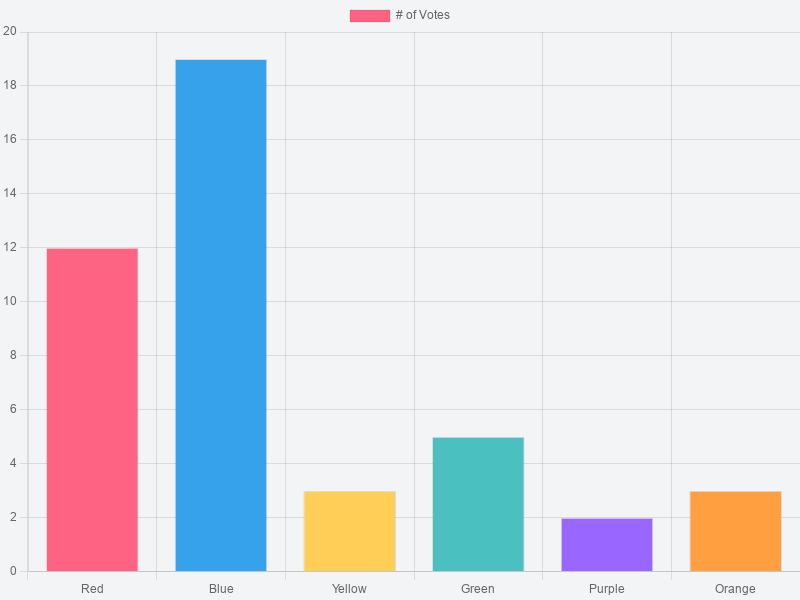
Now you have a generated graph image that can be distributed and shared on the internet for whatever use case you need. This process can be done as part of a static site generation process, where you call the API to generate all your dynamic images during build time using a data source and then your static site generator will pull them.
Or perhaps you can have your users generate dynamic reports and serve the image results to them as needed.
Image with a QR Code
We took a look at how to create a graph image in the previous section. Now let's take a look at how to use a QR Code in an image.
A good example of this would be to generate a dynamic coupon. So in this example, we will create a simple coupon, with a QRCode in the center of it that simply points to "https://cloudlayer.io" but it could be any data you want.
We will be using the popular QRCode framework called QRCode Styling.
The HTML for this example is a bit more complex, and longer due to all the styling but you can keep it simple if you would like. This illustrates a more complex example to show what's possible and still this only touches the surface.
<body class="bg">
<link
  href="https://fonts.googleapis.com/css2?family=Inter:wght@500;900&display=swap"
  rel="stylesheet"
/>
<script type="text/javascript" src="https://unpkg.com/[email protected]/lib/qr-code-styling.js"></script>
<div style="display: grid; height: 100vh; width: 100vw">
  <div class="txt">
    <p></p>
    <div style="display: grid">
      <div class="qr-code-container">
        <div id="qr-code" style="margin-top: 15px; margin-right: 2px"></div>
      </div>
      <img
        width="200"
        style="margin-right: auto; margin-left: auto; margin-top: 0"
        src="https://cloudlayerio.nyc3.digitaloceanspaces.com/cdn/coupon_tag-min.svg"
      />
    </div>
  </div>
  <div class="cout">
    <p class="one">SCAN THE CODE TO GET</p>
    <p class="cout2">10% OFF*</p>
    <p class="cout3">*ON ALL ACME CO. PRODUCTS</p>
  </div>
</div>
<script type="text/javascript">

  const qrCode = new QRCodeStyling({
      width: 180,
      height: 180,
      type: "svg",
      data: "https://cloudlayer.io",
      dotsOptions: {
          color: "#000",
          type: "rounded"
      },
      backgroundOptions: {
          color: 'transparent',
      },
  });

  qrCode.append(document.getElementById("qr-code"));
</script>
<style>
  .txt {
    text-align: center;
    margin-left: auto;
    margin-right: auto;
    margin-top: auto;
  }
  .cout {
    text-align: center;
    margin-left: auto;
    margin-right: auto;
    margin-top: 20px;
  }
  .cout :nth-child(1) {
    margin: 0 0 0 auto;
    color: #fff;
    font-weight: 500;
    font-size: 2rem;
    padding-top: 0.75rem;
  }
  .cout :nth-child(2) {
    margin: 0;
    color: #fff;
    font-weight: 900;
    font-size: 4rem;
    margin-top: 0.75rem;
  }
  .cout :nth-child(3) {
    margin: -50;
    color: #fff;
    font-weight: 500;
    font-size: 1rem;
    margin-top: 0.75rem;
  }
  .qr-code-container {
    width: 204px;
    height: 264px;
    background: center / contain no-repeat
      url("https://cloudlayerio.nyc3.digitaloceanspaces.com/cdn/qr_code_box-min.svg");
    margin-bottom: -30px;
  }
  .bg {
    font-family: "Inter", sans-serif;
    margin: 0;
    background: center / cover no-repeat
      url("https://cloudlayerio.nyc3.digitaloceanspaces.com/cdn/coupon_bg1.svg");
    background-size: 101vw 101vh;
  }
</style>
</body>In this example, you can see we import the QRCode Styling framework from the "unpkg" CDN URL using a script tag. Then there are a bunch of HTML and styles, and at the bottom, you will see we are importing images. These will be fetched from the internet during rendering.
Then again, nearly the same exact boilerplate code to call the Html to Image endpoint.
const fs = require("fs");
const fetch = require("node-fetch");

const html = fs.readFileSync("./marketing-coupon.html");
const opts = {
  html: Buffer.from(html).toString("base64"),
  viewPort: {
    height: 650,
    width: 800,
    deviceScaleFactor: 0.5,
  },
};

(async () => {
  const assetUrl = await getAssetUrl();
  console.log(assetUrl);
})();

async function getAssetUrl() {
  const data = await call("POST", "html/image", opts);

  return new Promise((resolve, reject) => {
    if (data.status === "pending") {
      let count = 0;
      const pollInterval = setInterval(async () => {
        const rsp = await call("GET", `jobs/${data.id}`);

        if(rsp.status === "success") {
            clearInterval(pollInterval);
            resolve(rsp.assetUrl);
        }

        if (count > 10) {
          clearInterval(pollInterval);
          reject("Timed out")
        }
      }, 500);
    }
  });
}

async function call(method, path, opts) {
  const rsp = await fetch(
    `https://api.cloudlayer.io/v2/${path}`,
    {
      method: method,
      body: JSON.stringify(opts),
      headers: {
        "Content-Type": "application/json",
        "X-API-KEY": "cl-your-api-key",
      },
    },
    opts
  );

  return await rsp.json();
}The resulting image from this will look like the following.

Pretty cool right? The resulting image can be whatever you want, it's all HTML and Javascript. You can use any Javascript framework, any CSS framework. The options are limitless really, you can download pre-made templates off the internet and use those as your starting point.
Let's take a look at one more example.
Flyer style Image
In this example, we create an image with all kinds of unique styles. This is another relatively simple example but it shows the kinds of things you can do using HTML and CSS to create a really eye-catching image.
<body class="bg">
<link
  href="https://fonts.googleapis.com/css2?family=Inter:wght@500;900&display=swap"
  rel="stylesheet"
/>
<p class="institute">INSTITUTE FOR EXAMPLES</p>
<div class="main">
  <p class="title1">ART</p>
  <p class="title2">Show Case</p>
  <div class="bottom">
    <div class="bottom-container">
      <p class="bottom-title">ENTRANCE FEE $5.00</p>
      <p>
        Lorem ipsum dolor sit amet consectetur, adipisicing elit. Possimus,
        earum qui nemo dignissimos sequi eos tempore aspernatur, natus officia
        exercitationem sapiente suscipit error quis in culpa quo id optio
        quidem.
      </p>
    </div>
  </div>
</div>

<style>
  .bg {
    font-family: "Inter", sans-serif;
    color: #fff;
    margin: 0;

    background: center / cover no-repeat
      url("https://images.unsplash.com/photo-1579547621113-e4bb2a19bdd6?crop=entropy&cs=tinysrgb&fit=max&fm=jpg&ixid=MnwxMTc3M3wwfDF8c2VhcmNofDF8fHZlY3RvciUyMGJhY2tncm91bmR8ZW58MHx8fHwxNjQ0MjgwMTg2&ixlib=rb-1.2.1&q=80&w=2000");
  }
  .main {
    position: absolute;
    bottom: 0;
    width: 100vw;
  }
  .institute {
    margin-top: 200px;
    padding: 10px 40px;
    border-bottom: 6px solid yellow;
    font-weight: 900;
    font-size: 0.95rem;
    position: absolute;
    right: 0;
  }
  .title1 {
    margin-top: -100px;
    margin-left: 25px;
    font-size: 6rem;
    font-weight: 700;
  }
  .title2 {
    margin-top: -110px;
    margin-left: 100px;
    font-weight: 700;
    font-size: 3.5rem;
    width: 1rem;
    line-height: 3rem;
  }
  .bottom {
    background-color: rgba(255, 255, 255, 0.2);
    height: 35vh;
    clip-path: polygon(100% 0, 100% 100%, 4% 100%, 0 0%);
  }
  .bottom-container {
    padding-left: 40px;
    padding-top: 20px;
  }
  .bottom-title {
    font-weight: 800;
    font-size: 1.25rem;
  }
</style>
</body>
The boilerplate code is nearly exactly the same as the previous two examples for brevity's sake we are going to leave that off. You can use the previous examples.
The resulting image will look the following.

As you can see you can use the HTML as the shell of your design, then pull data from an external source such as an API or Database, a CSV file, etc. and loop through your data, changing text, names, locations, prices and then calling the Html to Image API endpoint to generate the images. Let us do the work of putting all the pieces together, pushing it out to the internet, optimizing it for fast and quick delivery, putting on a worldwide CDN and Edge caches around the world, and giving you the URL that you serve to your users.
Conclusion
I hope you get the idea, and how it can be useful to generate images using the power of HTML, CSS, and Javascript. The rich ecosystem they offer with solutions readily available for nearly anything.
You can get started by creating a free account, and taking a look at our documentation for the Html to Image endpoint. We have tried to make generating images and serving those to your customers as painless as possible.
If you have any suggestions, or feedback about generating images please don't hesitate to reach out.
Related Blogs
 Eric
Eric Eric
Eric